Ethnic

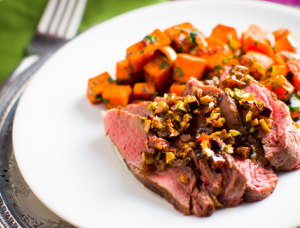
Slap Yo Daddy’s Sous Vide Beef Rendang

Courtesy of Harry Soo of Slap Yo’ Daddy BBQ
Winner Fan Favorite, 2013 Summer BBQ Challenge
Serves 4

INGREDIENTS

For the stew beef

Beef Rendang Sous Vide

  • 2 pounds (0.9 kg) stew beef (brisket works well)
  • 1 tablespoon (15 ml) SYD (Slap Yo’ Daddy) Hot Rub or salt and pepper

For the spice paste

  • 5 tablespoons (60 g) finely minced lemon grass, white part only (discard any tough parts)
  • 4 teaspoons (20 ml) peeled, chopped garlic
  • 8 shallots, peeled and chopped
  • 2 tablespoons (30ml) ground toasted coriander seed or coriander powder
  • 2 tablespoons (30 ml) mild chili powder
  • ½ cup (120 ml) canola oil, and more as needed to sauté the spice paste so it does not burn

For the liquid ingredients

  • 8 tablespoons (120 ml) premium coconut milk (use only the cream part by letting a can of coconut milk sit for a day; open the can gently and skim off the thick coconut cream portion and discard the watery part)
  • 2 teaspoons (10 ml) fish sauce
  • 4 teaspoons (20 ml) sugar
  • 1 teaspoon (5 ml) cinnamon
  • 4 teaspoons (20 ml) tamarind paste (available online or at Indian grocery stores)

For the aromatics

  • 2 cinnamon sticks
  • Thai or Serrano chilies, as many as you like
  • 8 whole cloves
  • 6 whole cardamom pods (from Indian grocery store)
  • 6 kaffir lime leaves or substitute with lime zest (available at Asian or Thai grocery stores)

For serving

  • 4 tablespoons (60 ml) toasted grated coconut
  • 4 cups (650 g) steamed jasmine rice, for serving


INSTRUCTIONS

  1. Fill and preheat the SousVide Supreme to 150F/65.5C.
  2. Preheat an oiled grill to high heat (or if you prefer, a smoke pit to 275F/74C.)
  3. Dice the beef into 1-inch (2.5 cm) cubes.
  4. Sprinkle the beef with some SYD Hot Rub or just salt and pepper.
  5. Put the beef onto the grill and quickly char the outside surface or smoke in the pit for 30 minutes. Set aside.
  6. Put all spice paste ingredients into a food processor and pulse. With the motor running, drizzle in enough canola oil to allow the spices to blend into a paste.
  7. On the stovetop, warm 2 tablespoons of the canola oil over gentle heat in a sauté pan.
  8. Transfer the spice paste to the sauté pan and sauté the spice mix until the oil begins to separate and the spice paste turns brown and fragrant (about 15-20 minutes). Set pan aside to cool.
  9. Mix the liquid ingredients in a bowl. Add the spice paste, browned meat, and aromatics. Stir thoroughly to coat the meat all over.
  10. Put the meat, spice paste, liquids, and aromatics into a large (gallon/3.8 liter) sous vide cooking pouch and vacuum seal. Take care not to pull liquid into the suction chamber, if using a suction vacuum sealer.
  11. Submerge in the water oven and cook for 2 to 3 days (48 to 72 hours) or more depending on how tender you prefer your beef.
  12. Remove the pouch, cut open, taste and adjust seasonings with salt and pepper.
  13. Mix in the toasted coconut flakes before serving with some steamed jasmine rice. Enjoy!

California Princess Roll – Paleo Sushi

Simply Paleo - Sous Vide California Princess Roll - Paleo Sushi Courtesy of simplypaleo.com

INGREDIENTS

For the steak

  • 1 TX Organics  Grass-fed  (or other) top sirloin
  • Salt and pepper to taste
  • 1 tablespoon (14 g) butter
  • Dash Coconut Aminos
  • 2 tablespoons (28 g) ghee

For the shrimp

  • 16 ounces (450 g) large shrimp, peeled, deveined, and thawed
  • Salt

For the curry sauce (for shrimp mixture)

  • ½ cup (120 ml) coconut milk (do not shake)
  • 1 tablespoon (15 ml) Sriracha
  • 2 teaspoons (10 ml) yellow or green curry paste

For the guacamole

  • 8 ounces (228 g) Avocado’s Number Guacamole (or your favorite recipe**)
  • 2 teaspoons (10 ml) Eden Wasabi Powder
  • Few drops of hot water

For the veggies

  • 6 spears asparagus
  • 3 green onions
  • 4 Tsukemono-style carrots (head to your local Japanese market)
  • ½ cucumber, peeled
  • 1 container radish sprouts
  • 1 package nori (seaweed) sheets
  • 1 container pickled ginger
  • 1 jalapeno
  • 1 small handful cilantro

For the Coconut Citrus Cream Sauce

  • Reserved coconut cream (from our can of coconut milk)
  • ½ orange, for juice only
  • ½ lime, for juice only
  • 1 teaspoon (5 ml) Sriracha
  • Pinch of Salt

For the assembly

  • Steak, shrimp, guac, veggies, and sauce
  • Bamboo mat
  • Nori sheets
  • Cutting board
  • Sharp chef’s knife
  • Clean kitchen towel
  • Cold water nearby to dip/rinse your knife


INSTRUCTIONS

For the steak

  1. Fill and preheat the SousVide Supreme to 138F/58C.
  2. Rinse the steak and pat dry. Dust with salt and pepper.
  3. Put the steak into a cooking pouch; add the butter and a dash of coconut aminos and vacuum seal.
  4. Submerge the pouch in the water bath and cook for at least 2 (and up to 4 hours.)
  5. When the steak has cooked, melt the ghee in a stainless pan on high heat and sear for 30 seconds to 1 minute per side. Set aside.

For the shrimp

  1. On the stovetop bring a large pot of salted water to a boil.
  2. Add the thawed shrimp and boil for about 3 minutes until just pink.
  3. Drain in a colander and pat dry with a paper towel.
  4. Put the shrimp into a food processor and pulse until they are very finely chopped. Set aside.

For the curry sauce

  1. Do NOT shake the coconut milk to mix, save the cream on the top and set aside, we’ll use this too!
  2. Put all the ingredients into a medium bowl and mix well
  3. Add the shrimp and stir. Set aside.

For the guacamole

  1. In a small bowl, mix wasabi powder with a little hot water so that it forms a paste.Let it sit for 5 minutes.
  2. Add guacamole and mix very well
  3. Taste and add more wasabi, if you like it hot!

**Chef’s Tip– Feel free to prepare your own guacamole from scratch! To keep this recipe a bit simpler, I chose to buy the goods.

For the veggies

  1. Cut away the bottom half of the asparagus spears, leaving just the ‘tip’ half for this dish (save the ends for a soup or stock
  2. Slice the spears in half lengthwise
  3. Trim the green onions, leaving the white bulb and a few inches (5 to 8 cm) of the green tops.
  4. Cut the onions in half lengthwise and then cut the halves again, leaving you with very thin slices.
  5. Slice the carrots really thin!
  6. Split and seed the cucumbers and slice into thin strips.
  7. Slice the jalapeño RAZOR thin

For the Coconut Citrus Cream Sauce

  • Mix all of the ingredients together to about the consistency of sour cream.
  • Set aside

For the assembly

  1. Lay a sheet of nori (seaweed) paper out on your bamboo mat
  2. Start by placing a “strip” of spicy guacamole horizontally across the seaweed, right in the middle.
  3. Next to that, add a “strip” of the spicy shrimp, about 2 fingers wide.
  4. On the other side of the guacamole, add strips of the steak, about 2 layers and 2 fingers wide.
  5. Finish by laying the cucumber and sprouts to the top (make sure you leave some sprouts out the end– purrty) and the green onion and pickled carrots to the bottom.
  6. Carefully start to roll the sushi, tucking the seaweed as you go. Roll it off of the bamboo mat and place the bamboo mat over the top of the roll to shape. This step may take some practice but it’s really fun! If you screw it up, just take the ingredients out and start with a fresh piece of seaweed.
  7. Dip your chef’s knife in cold water and slice the roll right in the center. Slice those 2 pieces in half again, dipping your knife in the water before each cut. This is crucial so you don’t squish your roll! (Repeat to make more rolls until the ingredients are all used.)
  8. Plate the sushi, add a small dollop of the Coconut Citrus Cream, a razor thin Jalapeno slice, a tiny bead of Sriracha and finish with one leaf of cilantro.
  9. Make sure to serve with a side of pickled ginger, coconut aminos and wasabi. I added an orange zest just to be fancy pants!

Moroccan Sirloin Steak

Moroccan Sirloin Steak paleo contest…with Fig Pistachio Butter and Sweet Potato Home Fries
Courtesy of Melissa Jouwan (clothesmakethegirl.com)
Serves 4

For the fries:
2 large sweet potatoes, peeled and cut into 1/2-inch (1.25 cm)cubes
1 medium onion, finely diced (about 1 cup)
1 ½ tablespoons (22.5 ml) coconut oil
(divided use)
1 teaspoon (5 ml) paprika
1/2 teaspoon (2.5 ml) chili powder
1/4 teaspoon (1.25 ml) salt
1/4 teaspoon (1.25 ml) ground black pepper
1 tablespoon (15 ml) minced fresh parsley leaves (about 1/4 cup fresh parsley)

For the steak:
4 TX Bar Organics sirloin steaks
1 large clove garlic, peeled and cut into 4 pieces
2 teaspoons (10 ml) Ras el Hanout (see below)
2 teaspoons (10 ml) clarified butter (ghee)

For the Fig-Pistachio Butter:
1/4 cup (60 ml) clarified butter (ghee)
2 dried figs, finely minced (about 2 tablespoons)
1 tablespoon (15 ml) finely chopped pistachios
1 clove garlic, crushed (about 1 teaspoon)
salt and ground black pepper, to taste

Prepare the potatoes…
1. Fill and preheat the SousVide Supreme to 183F/84C.
2. Put the potatoes into a cooking pouch in a single layer and vacuum seal.
3. Submerge the pouch in the water oven and cook for 90 minutes.
4. When the sweet potatoes cooked, remove the pouch from the water, open the pouch, drain the liquid, and set potatoes aside until ready to finish the home fries.

Cook the steak…
1. Reset the temperature of the SousVide Supreme to your preferred degree of doneness for the steak (120F/49C rare; 134F/56.5C medium rare; 140F/60C medium; 150F/65.5C medium well). Add cold water or ice to speed the process.
2. Rub each steak with the cut side of a piece of garlic, then sprinkle Ras el Hanout onto the surface and pat gently to coat the outside of the steak with the spice blend. 3. Dot the top of each steak with 1/2 teaspoon clarified butter and put each steak into a small (quart/0.9 liter) cooking pouch.
4. Submerge the pouches in the water oven and cook for at least 1 hour (or up to 4 hours or more to tenderize.)
.
Make the Fig-Pistachio Butter
1. About 5 minutes before the steaks are finished, put the clarified butter into a small saucepan and melt over low heat.
2. Add the minced fig, pistachios, and garlic and stir to combine; keep warm until ready to serve.

Make the home fries…

1. Heat a large skillet over medium-high heat, about 3 minutes.
2. Add coconut oil and allow it to melt.
3. Add the diced onion to the pan and sauté, stirring occasionally with a wooden spoon, cooking until nicely browned.
5. Add the paprika, chili powder, salt, and pepper; stir to combine.
6. Add an additional tablespoon of coconut oil to the skillet, and then the sweet potato cubes, shaking the skillet to make an even, single layer.
7. Cook the potatoes without stirring until the cubes are brown on the bottom, about 5 minutes, then carefully flip the potatoes with a large spatula, repeating this process until the potatoes are browned on most sides, another 5-10 minutes.
8. Remove to a serving dish and keep warm; toss with minced parsley to finish.

Sear the steaks and plate…
1. Remove the steaks from the water oven and the pouch. Pat dry.
2. Re-heat the same skillet until it’s very hot and sear the steaks for 30 seconds per side to brown and caramelize the surface.
3. Slice and drizzle with the Fig-Pistachio Butter and serve alongside the Sweet Potato Home Fries.

Jambalaya Sous Vide

It’s Mardi Gras, so as they say in Nawlins: laissez les bon temps rouler! What better way to celebrate than with one of the signature dishes of the Louisiana bayou’s world famous cuisine: Jambalaya. Filled with chicken and seafood and Cajun flavor, it’ll taste like you worked all day. We’ll keep your secret that the SousVide Supreme did most of the work for you!

Serves 4 (to multiply, make multiple pouches)

sous vide jambalaya

INGREDIENTS

For the chicken

  • 4 ounces (115 g) chicken, diced
  • 12 medium shrimps, peeled, deveined and chopped
  • 1 tablespoon (15 ml) Creole seasoning
  • 1/4 teaspoon (1.25 ml) salt (or to taste)
  • 4 ounces (115 g) Andouille sausage, sliced

For the rice

  • 2 tablespoons (30 ml) olive oil
  • 1/4 green bell pepper, seeded and diced
  • 1/4 yellow onion, peeled and diced
  • 1 stalk celery, trimeed and diced
  • 3 cloves garlic, peeled and minced
  • 1 medium tomato, seeded and diced
  • 3 bay leaves
  • 1 teaspoon (5 ml) Worcestershire sauce
  • 1 teaspoon (5 ml) Tabasco (or other hot sauce to taste)
  • 1 cups (120 g) medium or short grain rice, uncooked
  • 3 cups (720 ml) chicken broth
  • 1/4 teaspoon (1.25 ml) salt
  • 1/4 teaspoon (1.25 ml) black pepper


INSTRUCTIONS

  1. Fill and preheat the SousVide Supreme to 142F/61C.
  2. Season the chicken and shrimp with the Creole seasoning and salt and put it into a large (gallon/3.8 liter) cooking pouch in a single layer and vacuum seal.
  3. Put the Andouille sausage into a small (quart/0.9 liter) cooking pouch and vacuum seal.
  4. Submerge the pouches in the water oven to cook for 45 minutes to 1 hour.
  5. Meanwhile, on the stove top in a skillet over medium high heat, warm the olive oil and sauté the bell pepper, onion, and celery until tender. Add the garlic, tomatoes, bay leaves, Worcestershire and hot sauces and continue to cook for a minute or two more. Remove from the heat and let cool.
  6. When the chicken, shrimp, and sausage are done, remove the pouches and quick chill, submerged in an ice bath (half ice/half water) for 15 to 20 minutes, then refrigerate until ready to use. (This can be done up to a day in advance, if desired.)
  7. Raise the temperature of the water bath to 183F/84C to cook the rice.
  8. When the new cooking temperature has been reached, put the rice, cooked vegetables, and all remaining rice ingredients into a large (gallon/3.8 liter) zip-closure cooking pouch and use the displacement method (Archimedes’ Principle) to remove the air and zip the seal.
  9. Submerge the rice pouch in the water oven and cook for 45 minutes to 1 hour
  10. In the last 15 minutes of cooking, re-warm the pouches containing the chicken, shrimp, and sausage in a large bowl of hottest tap water.
  11. When ready to serve, open the rice pouch and pour into a warm serving bowl. Add the chicken, shrimp, and sausage, plus their accumulated pouch juices, to the rice and toss to distribute them throughout.
  12. Serve with a salad and warm, crusty bread and butter.

Tebasaki Chicken Wings Sous Vide


Tebasaki Sauce courtesy of Chika Machida
Serves 8 to 10

tebasaki-chicken-wings-sousvide

INGREDIENTS

For the chicken wings

  • 5 pounds (2 kg) chicken wings, split into flats and drumettes
  • 1 tablespoon (15 ml) kosher salt
  • 4 cups high smoke point oil, such as peanut or sesame oil for deep frying
  • 1 tablespoon (15 ml) lightly toasted sesame seeds, for garnish

For the Tebasaki Sauce

  • 1/4 cup (60 ml) soy sauce
  • 1/4 cup (50 g) dark brown sugar
  • 1/4 cup (60ml) mirin
  • 1/4 cup (60 ml) sake
  • 1-1/2 teaspoons (7.5 ml) juice of ginger root (grate the ginger, then juice and strain out the “stringy bits”)
  • 1-2 cloves garlic, peeled and minced
  • 1-1/2 tablespoons (22.5 ml) balsamic vinegar


INSTRUCTIONS

  1. Fill and preheat the SousVide Supreme to 170F/ 77C.
  2. Season the wings with salt and vacuum seal in cooking pouches in a single layer, using as many pouches as needed.
  3. Submerge the pouches in the water oven to cook for 4 hours (or up to 8 hours).
  4. Remove wings from pouch(es) and pat very dry with paper towels.
  5. In a saucepan over medium heat, mix together all Tebasaki Sauce ingredients, except balsamic vinegar, and bring to a boil. Remove from the heat, stir in the vinegar and set aside.
  6. Heat the peanut oil in a dutch oven or deep fryer to 400F/ 200C and carefully add the wings to the hot oil, working in batches and keeping them moving with tongs, until they are nicely golden brown.
  7. As you remove the wings from the oil, dunk them in the Tebasaki Sauce and put onto a serving platter. Tent with foil to keep warm until all wings are ready.
  8. Sprinkle the wings with the sesame seeds and serve.

Sous Vide Duck Confit Carnitas

Sous Vide Duck Confit CarnitasCourtesy of Chef Bri Van Scotter
Serves 4

INGREDIENTS

For the tacos

  • 4 duck legs
  • 1 tablespoon (15 ml) chili powder
  • 1 tablespoon (15 ml) salt
  • 1 tablespoon (15 ml) pepper
  • 4 tablespoons (60 ml) duck fat, plus 1 tablespoon (15 ml) additional for browning
  • 1 recipe Avocado Sauce (recipe follows)
  • 1 recipe Cabbage Slaw (recipe follows)
  • 8 warm corn tortillas

For the avocado sauce

  • 1 ripe avocado, peeled and seeded
  • 1/3 cup (80 ml) mayonnaise
  • 1/3 cup fresh cilantro
  • 2 green onions, trimmed and chopped
  • 2 tablespoons (30 ml) lime juice
  • 1⁄2 teaspoon (2.5 ml) cumin

For the cabbage slaw

  • 1 head cabbage, trimmed and finely sliced
  • 1 carrot, peeled and shredded
  • 1⁄2 red onion, peeled and thinly sliced
  • 1⁄4 cup (60 ml) rice wine vinegar
  • 1 tablespoon (15 ml) honey
  • salt and pepper, to taste


INSTRUCTIONS

For the tacos

  1. Fill and preheat the Sous Vide Supreme to 167F/75C.
  2. Sprinkle the duck legs evenly with the chili powder, salt and pepper, put into small cooking pouches (two legs per pouch) and pour the duck fat over.
  3. Vacuum seal the pouches and submerge in the water bath for 8-10 hours.
  4. After the duck is cooked, remove the legs from the pouches and let them rest until cool until cool enough to handle.
  5. Remove the duck meat from the bone and shred into pieces.
  6. In skillet on the stovetop, heat the remaining tablespoon of duck fat and sauté the shredded duck, stirring occasionally, until about half of the meat is browned and crisp, about 5 minutes.
  7. Pile shredded duck onto warm corn tortilla, top with the Avocado Sauce and Cabbage Slaw and enjoy!

For the avocado sauce

  1. In the bowl a blender combine all ingredients and blend until smooth.

For the cabbage slaw

  1. Combine all ingredients in a bowl and toss well to combine.

Birria (Mexican Goat)

Courtesy of Sally MacColl (svkitchen.com)
Serves 6 as a stew or 8 as tacos, with enough for some seconds

Birria (Mexican Goat) #sousvide

Photograph credit: svkitchen.com

INGREDIENTS

  • 6 pounds (2.7 kg) goat shoulder, bone in, trimmed of excess fat
  • 1 tablespoon (15 ml) each sea salt and freshly ground black pepper
  • 4 dried ancho chiles
  • 4 dried guajillo chiles
  • 4 dried chiles negro (dried Pasilla) or cascabel chiles
  • 1 dried chipotle chile
  • 12 garlic cloves, skin left on
  • 3 dried smoked tomatoes, optional (if you don’t have them, just omit)
  • 2/3 cup (180 ml) cider vinegar
  • 1/2 medium yellow onion, finely chopped
  • 2 bay leaves
  • 1 teaspoon (5 ml) dried Mexican oregano
  • 1/2 teaspoon (5ml) dried thyme leaves
  • 1/4 teaspoon (2.5 ml) ground cloves
  • 1/4 teaspoon (2.5 ml) ground cumin
  • 1/4 teaspoon (2.5 ml) ground cinnamon
  • Plus sour cream, radishes, avocado, onion, cilantro, tortillas or taco shells, optional for serving


INSTRUCTIONS

  1. Cut the meat into 3 equal-sized portions. This will enable you to divide the meat into 3 large cooking pouches, but do not seal. Simply fold over the tops. You may have to cut a piece or two through the rib section. Rub all surfaces of the meat with the salt and pepper and set aside in the refrigerator.
  2. On a hot griddle or in a cast iron pan over medium-high heat, lightly toast one side of the dried chiles for a few minutes, or until they’re just softened. Turn and press down on the chiles with the back of a spatula to ensure all the surfaces are lightly seared. They will begin to release some of their aroma. Be careful not to burn the skins. Remove the chiles from the griddle and discard the stems and seeds. Transfer the chiles to a large bowl and set aside while you toast the garlic.
  3. Place the garlic cloves, skins intact, on the same griddle or pan. Gently brown all sides, turning often to prevent burning. The garlic will take longer than the chiles, but eventually will soften. When soft, remove the garlic from the pan and discard the skins and any root ends. Set the garlic aside.
  4. Add the smoked tomatoes, if you’re using them, to the bowl with the chiles. Cover with boiling water and, if necessary, weigh down the floating chiles with a smaller bowl. Soak for 20 to 30 minutes. Drain, lightly pat dry with a paper towel, and transfer to the bowl of a food processor. Add the cider vinegar, toasted garlic, onion, and the remaining dried herbs and ground spices. Purée, scraping down the sides of the bowl as needed, until the mixture becomes a paste.
  5. Remove the meat from the refrigerator and spread the paste on all sides of the meat. Divide the goat pieces evenly across the cooking pouches. Vacuum seal. Refrigerate overnight or up to 24 hours. Remove the sealed pouches from the refrigerator and let the meat come to room temperature, 1 to 2 hours.
  6. When ready to cook, fill and preheat the SousVide Supreme to 142°F (61°C). (This temperature rendered the meat fork tender and a perfect shade of pink.)
  7. Submerge the pouches and cook for 72 hours (yes, that’s 3 days).
  8. Remove and open the pouches and transfer the goat to a large cutting board, reserving the pouch juices. Tent the meat with foil until ready to serve.
  9. Pour the juices into a small saucepan and simmer over medium heat until thickened, about 15 minutes.

To serve as stew: Leave the meat on the bone or debone and cut into bite-sized size chunks, transfer to individual serving bowls, and ladle the sauce over the meat. The extra meat (if there is any!) will keep in the refrigerator for 3 days or the freezer for 3 months.

To serve as tacos: Debone and shred the meat, then moisten with some of the reduced bag juices. Spoon onto hot tortillas or taco shells, nap with tomatillo salsa, and garnish with sour cream, sliced radishes, sliced avocado, grated cheese, or your favorite accompaniments.

Udon with 36-hour Pork Belly

Courtesy of Stephane Lemagnen (zencancook.com)
Serves 6

INGREDIENTS

For the sous vide pork belly

  • 2 pounds (0.9 kg) pork belly, skin on
  • 1/4 cup (60 ml) kosher salt
  • 1 teaspoon (5 ml) coriander seeds, coarsely ground
  • 1 teaspoon (5 ml) star anise, coarsely ground
  • 1 teaspoon (5 ml) cardamom, coarsely ground
  • 1 teaspoon (5 ml) black pepper, coarsely ground
  • 1/2 stick cinnamon, coarsely ground
  • 1/4 cup (60 ml) sake
  • 1/4 cup (60 ml) mirin
  • 1/4 cup (60 ml) soy sauce

For the dashi (udon broth)

  • 2 quarts (1.8 liters) water
  • 5 squares (6-inches/15 cm) dried kombu
  • 1 cup (240 ml) tightly packed bonito flakes

For the udon

  • 6 handfuls udon noodles
  • 2 heads enoki mushrooms
  • 10 shiitake mushrooms
  • 6 organic eggs
  • some leafy greens, such as bok choy
  • nori/ dry shrimp mix
  • hot pepper

INSTRUCTIONS

For the sous-vide pork belly

  1. Rinse the pork belly and pat dry.
  2. In a small bowl, combine the salt and ground spices.
  3. Coat the pork belly with the salt and spice mixture, place in a pyrex dish, cover and refrigerate for 12 to 18 hours.
  4. When ready to cook, fill and preheat the SousVide Supreme to 144F/62C.
  5. Wash off the salt cure in cold running water and dry the pork belly.
  6. In a small bowl, combine the sake, mirin and soy sauce.
  7. Put the pork belly into a large cooking pouch with the sake mixture and vacuum seal. (Take care not to pull the liquid into the suction portal if using a suction vacuum. Alternatively, use a zip closure cooking pouch and the displacement principle to seal the pouch.)
  8. Submerge the pouch in the water bath and cook for 36 hours.
  9. Remove the pork belly from the water bath and quick chill, submerged in a bowl of iced water. Do not open the pouch. Refrigerate overnight with a weight on top.
  10. Open the pouch and scrape off the pork “consommé” from around the belly and use with the dashi (see below step 5).

For the dashi (udon broth)

  1. Place the squares of kombu in a pot, along with the two quarts of water.
  2. Over medium heat, slowly bring the pot of water to a near-boiling point. Remove the kombu.
  3. Add the bonito flakes. Wait for a few seconds until the liquid comes to a light simmer and turn off the heat.
  4. Let the bonito flakes sink to the bottom of the pot. Strain the dashi through a fine strainer.
  5. In a small saucepan melt the pork consommé gelatin. Strain and combine with the dashi to taste.

For the udon

  1. Fill and preheat the SousVide Supreme to 147F/64C.
  2. Gently place the eggs (in their shells) into the water and cook for 45 minutes.
  3. Meanwhile bring the pot of dashi to a simmer; add the udon noodles and cook until tender.
  4. Add the enoki and shiitake mushrooms and poach them gently in the broth.
  5. Add the leafy greens.

Finishing:

  1. Pan-fry a chunk of pork belly on the skin side until crisp and place in a 325F/163C oven until tender throughout.
  2. Ladle the udon and broth into large bowls. Top with mushrooms, greens, pork belly slices, nori and hot pepper. Crack the poached egg on top and serve.