Featured Guests

Sweet Corn Cheesecake Sous Vide

with Cornmeal Crumble, Corn Caramel and Blueberry Salsa
Courtesy of Season 1 MasterChef Winner Whitney Miller

Sweet-Corn-Cheesecake-Whitney-Miller-photo-1024x768

Serves 4

INGREDIENTS

For the cheesecake

  • 1/4 cup (60 ml) heavy cream
  • 1/2 cup (80 g) fresh sweet corn kernels
  • 1 large whole egg
  • 1/3 cup (63 g) granulated sugar
  • 1 (8 ounce/228 g) package cream cheese, softened
  • 1/4 cup (60ml) sour cream
  • 1/2 tablespoon (7.5 ml) all-purpose flour
  • 1/8 teaspoon (1.25 ml) orange zest

For the crumble

  • 1/4 cup (45 g) fine ground cornmeal
  • 2 tablespoons (30ml) granulated sugar
  • pinch sea salt
  • pinch powdered ginger
  • 1-1/2 tablespoons (21 g) cold unsalted butter, cubed
  • 2 tablespoons (15 g) pine nuts

For the corn caramel
Yields: about ¾ cup

  • 1/2 cup (120 ml) heavy cream
  • 1/3 cup (53 g) fresh sweet corn kernels
  • 1/2 cup (96 g) granulated sugar
  • 3 tablespoons (43 g) unsalted butter, cubed

For the blueberry salsa

  • 1 cup (148 g) fresh blueberries or frozen blueberries, thawed
  • 2 teaspoons (10 ml) orange juice
  • 1 teaspoon (5 ml) white balsamic vinegar
  • 2 basil leaves, julienned


INSTRUCTIONS

For the cheesecake

  1. Fill and preheat SousVide Supreme to 170F.
  2. In a small saucepan, combine the cream and corn; cover and cook over medium heat, stirring occasionally, for 5 minutes. Reduce heat to low and cook for 15 minutes more.
  3. Strain through a mesh strainer over a small bowl.
  4. Using a hand held electric mixer, beat the egg in a separate mixing bowl until light and pale yellow.
  5. Incorporate the sugar into the beaten egg.
  6. Beat the cream cheese and sour cream into the egg mixture until smooth.
  7. Lastly, beat in the corn cream, flour, and orange zest until well combined.
  8. Transfer the cream cheese mixture into a small (quart/0.9 liter) zip-closure cooking pouch; use the Archimedes Principle to evacuate as much air as possible and zip the seal.
  9. Submerge the pouch in the water oven and cook for 2 hours. When cooking is complete, quick chill the pouch, submerged in an ice water bath for 15 minutes, and refrigerate, flat, for at least 1 hour.

For the crumble topping

  1. Preheat the traditional oven to 350F.
  2. In a small bowl, mix the cornmeal, sugar, salt, and ginger together.
  3. Using two forks or a pastry cutter, cut the butter into the cornmeal mixture until the mixture resembles wet sand.
  4. Stir in the pine nuts.
  5. Pour the crumble mixture onto a baking sheet and bake for 10-12 minutes, stirring the mixture halfway through the baking time. Remove and set aside.

For the caramel sauce

  1. In a small saucepan, combine the cream and corn. Cover and cook over medium heat for 5 minutes, stirring occasionally.
  2. Reduce heat to low and cook for 15 minutes.
  3. Remove from heat and strain through a mesh strainer over a medium bowl.
  4. In a heavy bottom 2 quart saucepan, sprinkle the sugar over the bottom of the pan and cook for about 6 minutes, stirring occasionally. Once sugar begins to melt, stir vigorously with a wooden spoon.
  5. When sugar has dissolved, turn the heat to low and immediately add the butter, stirring until melted.
  6. Remove from heat and stir in the corn milk until combined.

For the blueberry salsa

  1. In a small bowl, stir the blueberries, orange juice, balsamic, and basil leaves together.
  2. Cover and refrigerate until ready to use.

To finish and serve

  1. Remove the cheesecake pouch from the refrigerator and carefully cut away the top of the pouch.
  2. Using a sharp knife, dipped in warm water, slice the cheesecake into four long rectangles.
  3. Carefully transfer the individual pieces of cheesecake to dessert plates using an offset spatula (dipped in warm water and patted dry).
  4. Top each serving with the cornmeal crumble and a mound of the blueberry salsa.
  5. Drizzle a spoonful of corn caramel onto each plate beside the cheesecake. (Save the rest, tightly covered in the refrigerator, for use for a week or two.)

An Interview with New York Chef James Briscione

We recently had the chance to talk to Chef James Briscione (Institute of Culinary Education in New York) about his experience with sous vide cooking (and our humble machine in particular.) He’ll be teaching classes featuring sous vide cooking at the Institute in New York City this summer for aspiring chefs and even one recreational cooking classes for us foodies. In it, Chef Briscione will take students through the ins and outs of this precise cooking method and help them understand how to get flavors and textures out of food they maybe never have thought possible. Foods prepared will include: 45 Minutes Eggs; Chicken Breasts; Beef Short Ribs and more. If you are in the New York City area August 19 and are interested you can find the
(Registration information and Class calendar here.) For the rest of us not geographically lucky enough to be able to attend the class, Chef Briscione was kind enough to provide one of his favorite sous vide recipes.

SVS: When/how did you first come to sous vide cooking?

JB: The first time I saw anything cooked sous vide was at Restaurant Daniel [Chef Daniel Boulud’s premier restaurant in New York City] but it wasn’t until I started teaching at The Institute of Culinary Education in 2007 that I began to really use and experiment with it. In 2010 I had the chance to go to Venice, Italy to train with an Italian chef who is an absolute sous vide wiz and my technique and production has grown in leaps and bounds since then.

SVS: In your opinion, what food (or food category) benefits most from the technique?

JB: So many different types of food can become truly magical when cooked sous vide, it’s really tough to pick one that benefits the most. Since the majority of people over cook chicken with traditional methods, I think a sous vide chicken breast can be a truly eye opening experience.

SVS: What’s the most delicious or unusual sous-vide cooked food you’ve ever tasted? Or cooked yourself?

JB: Maybe not unusual, but one of the most unexpected things I ever made sous vide was citrus syrups that I used to create homemade sodas and cocktails. I pack segments of citrus in bags with sugar and cook them very gently (at 135˚F) until the sugar draws the juices out of the fruit and dissolves to create the syrups. The great thing about this technique is that unlike simmering, the citrus flavor remains bright, fresh and aromatic.
And then there was the time that de-boned a pigs head- whole- cooked it sous vide and made it into a torchon.

SVS: Wow! We’ll need to circle back to learn more about this whole pigs head adventure when we’ve got more time. Apart from a pig’s head torchon, what’s your go-to sous vide dish to impress?

JB: For me, beef short ribs and/or a ribeye steak are going to blow people away every time. I set my sous vide supreme to 132.5˚F (56˚C), put the seared short ribs in one bag and a ribeye steak in another. I leave the short ribs to cook for 48 hours and the steak just a quick 2.5 hours. Afterwards I re-sear both meats and baste them butter, garlic and thyme. Then I serve a few slices of each meat together with whatever my favorite seasonal side dish may be at the time.

SVS: Have you ever had a total sous vide flop? If yes, why? What happened?

JB: Too many to count! I think one of the popular misconceptions of sous vide is that because you’re cooking at a low temperature you can’t over cook your food. I’m here to tell you it’s not true.

SVS: You certainly can overcook if you set the water oven to too hot a temperature. So what happened?

JB: One of my biggest flops was a pork loin that I though I was going to make so tender and juicy by cooking it for 6 hours at 150˚F. Needless to say tender and juicy are probably the last two words you would use to describe that meal!

SVS: So what did you learn from that experience?

JB: I learned two great things from that gigantic flop. #1 – 150F is a fine internal temperature, if you’re roasting or grilling pork (though maybe still just a touch high), but those standard temperatures don’t always translate directly for sous vide cooking. [You really have to follow the temperature guides that have been worked out.] Especially with pork. It doesn’t need to be cooked nearly as high, when done sous vide. And #2 – tender cuts need shorter cooking times. No matter how you may try, you can’t make a tender cut turn out like a braise, so don’t try. Cook tender meats just until done, then stop!

SVS: How do you incorporate this technique into your daily work/home life?

JB: Just like everyone else, we are a busy family. As a writer my wife works from home, which means she’s holding down two full time jobs, since she cares for our 3-year-old daughter as well. One of her favorite quick lunches is sous vide salmon. We’ll cook 3 or 4 pieces of salmon in individual bags on a Sunday, then store them in the refrigerator for the week. That way she can just zip open a bag and have lunch ready in minutes. She’s a great cook too so she is always whipping up a new sauce or relish with fresh ingredients from the farmer’s market to top her fish.

Also, living in a New York City apartment, counter and oven space is in high demand, so when ever we entertain, we always prepare the entrée in our sous vide supreme, so we have plenty of space for the important things like a pitcher of cocktails or glasses of wine!

SVS: Why do you think the sous vide trend has now taken off?

JB: Before the proliferation of sous vide, home cooks couldn’t have access to same tools and equipment as a professional chef without remodeling their entire home. Now, not only can they use the exact same tools professional chefs around the world are using, they can get the same results.

SVS: What do you think foodie home cooks love about the technique?

JB: Whether you grill, broil or sauté a chicken breast, the result is going to be pretty similar. Sous vide cooking is so unique. It creates a product unlike anything else. The results are truly memorable and the best part is, the technique is totally accessible. You do not need years of practice and training to get a great result.

SVS: What do chefs love about the technique?

JB: Professional cooking is about consistency. You want every person in your dining room to have the same great experience. So as a chef, you have to make sure that every piece of food that leaves the kitchen is perfect. When you cook sous vide, you get a consistent, reliable product and you can be confident no one is struggling to saw through an over cooked steak. Plus, sous vide allows chefs creates textures in food that are impossible through any other technique.


SVS: OK. Let’s go to the other end of the spectrum. What would you recommend as an easy ‘get started with sous vide’ food – a real no fail for the novice cook?

JB: I think simple proteins that only need short cooking times are the best place to start. Salmon filets are ready in just 20 minutes or a boneless chicken breast that is done in 30 minutes. You vary their flavor so much with how you season them before cooking and you can finish them in different ways- seared, grilled broiled, fried- the possibilities are endless. Of course, easiest of all but still an amazing result is the 45 minute egg- no vacuum or bags required- just perfectly poached eggs every time.

SVS: How does the SousVide Supreme (or SousVide Supreme Chef) compare to other sous vide cooking equipment you’ve used?

JB:My wife bought me a SousVide Supreme for Christmas years ago and I have loved it ever since. Other sous vide equipment can be bulky or require big containers for a water bath. Living in New York City where my kitchen is size of most people’s bathrooms, SousVide Supreme is the ideal solution. But it’s not just about saving space- the SousVide Supreme is as accurate and reliable as any machine I have ever used. Mine has been turning out consistently delicious results for almost 3 years now!

Visit James Briscione’s personal blog here.

Duck Confit Sous Vide

Recipe courtesy of Michael LaRoche, Head Butcher and Chef for Bill the Butcher
Serves 2

Sous Vide Duck Confit #sousvideINGREDIENTS

For the ducks legs

  • 2 duck legs
  • 2 tablespoons (30 ml) duck fat
  • salt and herb cure mix (recipe follows)

For the Salt and Herb Cure (enough for 2 duck legs)

  • 1 tablespoon (15 ml) Kosher salt
  • 1 teaspoon (5 ml) crushed black pepper
  • crushed fresh herbs such as thyme, bay leaf, clove.

Adjust amounts to have even thorough coverage of the all duck legs you cook.

INSTRUCTIONS

  1. Rub duck legs with the cure and refrigerate at least 8 hours, overnight if possible.
  2. Fill and preheat SousVide Supreme to 168F/75.5C.
  3. Gently rinse the salt cure off the duck legs and pat dry.
  4. Use a small sharp knife to carefully remove the skin from the legs in one whole piece, if possible, and set aside.
  5. Put the skinless duck legs into a cooking pouch with a dollop (a generous tablespoon/15ml) of duck fat per leg.
  6. Submerge the pouch in the SousVide Supreme for 12 hours.
  7. Prior to serving, crisp the duck skin in a skillet over low heat until browned.

Suggested Serving Sides: Lentilles du Puy, Mustard Veloute

SousVide Supreme Meats Bill the Butcher – Duck Confit from SousVide Supreme on Vimeo.

Udon with 36-hour Pork Pelly

Longing for something light, but savory, that won’t heat up the house in the hot weather? Try this delicious recipe for Udon with 36-hour Pork Belly, brought to us courtesy of the culinary genius of Stephane Lemagnen of the Zen Can Cook blog.

The belly cooks for 3 days–yes, 3 days–but unlike traditional cooking methods, the SousVide Supreme won’t heat up the kitchen doing it! The water oven rapidly heats up and then maintains hour after hour and even day after day using no more energy than a 60 watt light bulb. It’s the most energy efficient way to cook, which is especially nice if the electric bill is going sky high already from the a/c!

Udon with 36-hour Pork Belly

Courtesy of Stephane Lemagnen (zencancook.com)
Serves 6

INGREDIENTS

For the sous vide pork belly

  • 2 pounds (0.9 kg) pork belly, skin on
  • 1/4 cup (60 ml) kosher salt
  • 1 teaspoon (5 ml) coriander seeds, coarsely ground
  • 1 teaspoon (5 ml) star anise, coarsely ground
  • 1 teaspoon (5 ml) cardamom, coarsely ground
  • 1 teaspoon (5 ml) black pepper, coarsely ground
  • 1/2 stick cinnamon, coarsely ground
  • 1/4 cup (60 ml) sake
  • 1/4 cup (60 ml) mirin
  • 1/4 cup (60 ml) soy sauce

For the dashi (udon broth)

  • 2 quarts (1.8 liters) water
  • 5 squares (6-inches/15 cm) dried kombu
  • 1 cup (240 ml) tightly packed bonito flakes

For the udon

  • 6 handfuls udon noodles
  • 2 heads enoki mushrooms
  • 10 shiitake mushrooms
  • 6 organic eggs
  • some leafy greens, such as bok choy
  • nori/ dry shrimp mix
  • hot pepper

INSTRUCTIONS

For the sous-vide pork belly

  1. Rinse the pork belly and pat dry.
  2. In a small bowl, combine the salt and ground spices.
  3. Coat the pork belly with the salt and spice mixture, place in a pyrex dish, cover and refrigerate for 12 to 18 hours.
  4. When ready to cook, fill and preheat the SousVide Supreme to 144F/62C.
  5. Wash off the salt cure in cold running water and dry the pork belly.
  6. In a small bowl, combine the sake, mirin and soy sauce.
  7. Put the pork belly into a large cooking pouch with the sake mixture and vacuum seal. (Take care not to pull the liquid into the suction portal if using a suction vacuum. Alternatively, use a zip closure cooking pouch and the displacement principle to seal the pouch.)
  8. Submerge the pouch in the water bath and cook for 36 hours.
  9. Remove the pork belly from the water bath and quick chill, submerged in a bowl of iced water. Do not open the pouch. Refrigerate overnight with a weight on top.
  10. Open the pouch and scrape off the pork “consommé” from around the belly and use with the dashi (see below step 5).

For the dashi (udon broth)

  1. Place the squares of kombu in a pot, along with the two quarts of water.
  2. Over medium heat, slowly bring the pot of water to a near-boiling point. Remove the kombu.
  3. Add the bonito flakes. Wait for a few seconds until the liquid comes to a light simmer and turn off the heat.
  4. Let the bonito flakes sink to the bottom of the pot. Strain the dashi through a fine strainer.
  5. In a small saucepan melt the pork consommé gelatin. Strain and combine with the dashi to taste.

For the udon

  1. Fill and preheat the SousVide Supreme to 147F/64C.
  2. Gently place the eggs (in their shells) into the water and cook for 45 minutes.
  3. Meanwhile bring the pot of dashi to a simmer; add the udon noodles and cook until tender.
  4. Add the enoki and shiitake mushrooms and poach them gently in the broth.
  5. Add the leafy greens.

Finishing:

  1. Pan-fry a chunk of pork belly on the skin side until crisp and place in a 325F/163C oven until tender throughout.
  2. Ladle the udon and broth into large bowls. Top with mushrooms, greens, pork belly slices, nori and hot pepper. Crack the poached egg on top and serve.


Peach Bread Pudding Sous Vide

Sous Vide Peach Bread Pudding

… with Sweet Tea Rum Sauce
Courtesy of MasterChef season one Winner Whitney Miller
Serves 5

INGREDIENTS

For the bread pudding

  • 1 French baguette, crust removed, cut into 1-inch cubes (about 3 cups)
  • 1 cup (240 ml) half-and-half
  • 1/3 cup (80 ml) heavy cream
  • 1 large egg, whole
  • 3 large egg yolks
  • ½ cup (96 g) granulated sugar
  • 1 teaspoon (5 ml) pure vanilla extract
  • Pinch cinnamon
  • 2 small peaches, diced (or 1 cup frozen slices, thawed and diced)

For the sweet tea rum sauce

  • 1 ¼ cups (305 ml) water
  • 1 tea bag (black unflavored tea)
  • 1 cup (192 g) sugar
  • 1 teaspoon (5 ml) cornstarch
  • 1 tablespoon (14 g) butter
  • 1 teaspoon (5 ml) rum


INSTRUCTIONS

  1. Fill and preheat the SousVide Supreme to 170F/77C. Preheat the traditional oven to 350F/177C.
  2. Put the bread cubes in a single layer on a baking sheet and toast in the traditional oven for 5 minutes.
  3. In a large bowl, whisk together the whole egg, egg yolks, and sugar.
  4. In a small saucepan, over medium heat, combine the half-and-half and heavy cream and heat until tendrils of steam begin to escape the surface.
  5. Whisk the egg mixture constantly as you slowly dribble in some of the hot cream to temper the eggs. Continue to whisk as you add the remainder of the cream.
  6. Stir in the vanilla, cinnamon, and diced peaches.
  7. Fold in the bread cubes and let the mixture sit for 2 minutes or until the bread has absorbed the liquid.
  8. Grease 5 (16 oz.) wide-mouth mason jars with cooking spray.
  9. Divide the bread pudding mixture evenly among the mason jars. Screw on the lids.
  10. Carefully lower the mason jars onto the perforated bottom rack of the water oven and cook for 2 hours.

For the sauce 

  1. In a saucepan over medium high heat, bring the water to a boil. Add the tea bag and boil for 2 minutes. Remove from the heat and discard the tea bag.
  2. Reduce the heat to medium, return the saucepan back to the heat and add the sugar, stirring until dissolved. Continue to cook for 3 minutes.
  3. In a small bowl, combine a teaspoon of water and the cornstarch. Stir this slurry into the sweet tea and cook for 2 minutes over medium-high heat, whisking constantly.
  4. Stir in the butter and rum and continue to cook for 3 minutes. Remove from the heat and allow to slightly thicken.

Serving

When the pudding has cooked, carefully transfer the mason jars from the water bath to the SousVide Supreme lid with tongs. Allow the jars to cool for 3 or 4 minutes, then using a tea towel, remove the jars’ lids and spoon the sauce over the pudding. Serve immediately.

Interview with Jason Logsdon

If you’ve ever searched for sous vide recipes, sous vide cooking times and temperatures, or sous vide cooking tips, odds are you’ve been directed to Jason Logsdon’s CookingSousVide.com. He took time out of his busy schedule of writing about all things sous vide to speak with us about all things sous vide.

What sparked your interest in sous vide cooking?

The first time I really remember cooking was when my mom decided to go to graduate school and my dad and I had to do our part by making the meals. Since then I’ve always enjoyed cooking and once I was out on my own I dabbled a lot more in different cuisines and techniques.

I got started with sous vide when my wife bought me Under Pressure and I thought the whole thing was fascinating. I wanted to try it out at home but there wasn’t much information available in an easy-to-digest format. Most of the information was from a scientific standpoint, such as Baldwin’s great guide, but it struck me that for the average home cook that knowledge wasn’t overly important (many people can roast a chicken but they don’t need to understand the thermal curve of the meat in oven to do so).

To solve this problem, I tried to work from the standpoint of a typical home cook and came up with the critical information they needed to know in order to sous vide at home. Over time I’ve added many of the more advanced concepts, but I still have a focus on helping the typical home cook who is more interested in preparing great food than understanding the science behind it.


How has the SousVide Supreme changed sous vide cooking for you?

I really enjoyed using the Sous Vide Supreme and it seemed to hold its temperature better and not overshoot the temperature as much as I’d experienced with the crockpot setup. The first thing I cooked with it was a chuck roast because I wanted to see how the temperature held up over a long period of time, and to see how quiet it was at night. It did great and I didn’t notice it in the other room while I was sleeping at all. I also used it for eggs and vegetables while I had it because my crockpot struggled to get up to high enough temperatures to properly cook those foods.

My use of sous vide has definitely increased and I cook something sous vide 4 or 5 times a week.

Did you create new recipes, refine existing ones, or did you find that your existing sous vide recipes adapted easily for this book?

Some of our recipes were from our other books, Beginning Sous Vide and Sous Vide Grilling, and refined for Help for the Busy Cook but most of the recipes were brand new. Like most of our books, we try to teach the reader how to really use and understand sous vide so they can apply it to their favorite traditional recipes.


Without giving away your whole book, what are some of your tips for busy cooks?

The biggest tip I can give for busy cooks, and really the premise of the whole book, is to understand the gaps between “active” times and how to manipulate them. Sous vide cooking is split into three stages: Pre-Bath, Cooking, and Finishing. Thinking of it this way allows you to do the hands-on work at one time, do the actual cooking at a different point, and finish the dish at a third point, all as your schedule permits.

For instance, you can season and bag a sirloin steak Tuesday night after dinner and put it in the refrigerator. Then on Wednesday or Thursday morning you can put it into your water bath on the way out the door. When you get home 8 to 10 hours later it will be fully cooked and you can quickly sear it and make any sides.

Our book focuses on the four different ways to make sous vide fit your schedule: Day-Of Meats, Multi-Day Meats, Fast Cookers, and Cook, Chill, and Hold. We provide a general outline of each process, which foods work well in each one, and about 20 recipes of each kind to illustrate them.

These techniques are great for anyone with a busy schedule, from single 9-to-5 workers to stay-at-home parents, and even to college students.


Have you seen an evolution in the community you’ve built (i.e.: more new people trying sous vide, more people experimenting with tastes or methods of preparation)?


The sous vide community is definitely evolving. When I got into it the community was mainly chefs and more scientifically-minded home cooking enthusiasts. As more people learn about it from TV shows and local restaurants I’ve found the community is quickly growing with “normal” home cooks.

To me, normal home cooks and professionals approach sous vide, and cooking in general, in very different ways. The professionals want to cook the best meal, consistently, over a period of time, so precision and complex flavors are very important.

On the other hand, home cooks want to cook a great meal, around their schedule, and with minimal effort. A working parent is usually willing to sacrifice some quality if it means dinner will be ready around the kids’ activities with minimal effort.


What inspired you to write your new book, Sous Vide: Help for the Busy Cook?

Many people view sous vide cooking as this precise method that takes up lots of time and is very exacting.  However, to me one of the biggest benefits of cooking with sous vide is how easy it is to fit around my schedule.

Because of the wide margin of ideal “doneness,” most foods can be held for several hours with no negative effects. This allows me to fully cook the food and have it ready to go whenever I want to eat, which is especially helpful when my wife gets stuck in meetings and comes home 2 hours later than expected!

That disconnect between people’s perceptions of sous vide and my own experience with it really led to the creation of Sous Vide: Help for the Busy Cook. People’s lives are busier than ever and sous vide makes it very easy to create great meals around even the most hectic schedules.


Where do you see your site, and your sous vide cooking, going in the next year?

One of my personal sous vide goals is to branch out my cooking. I currently focus most of my sous vide energy on meat and fish. I’d like to experiment more with beans, custards, and other less common items to get a better feel for how they work.

We have several goals for CookingSousVide.com over the next year. We’re going to add many more recipes to the site and flesh out our equipment section. We’re also going to continue to grow our great community there, as many of its members are active on our forums and contribute a lot of knowledge to the site.

Following the success of our other books we are also looking to do a different kind of sous vide cookbook, which we’ll release more information about we get closer to the publishing date.

For more information on Jason Logsdon, his books, or his recipes, visit www.CookingSousVide.com. You can tweet with him at @JasonLogsdon_SV.

Sharone’s Short Rib Sliders

Courtesy of Master Chef’s Sharone Hakman (SharonHakman.com)
Serves 12

INGREDIENTS

For the beef short ribs

  • 12 to 14 beef short ribs (about 2 ½ pounds/ 1 kg)
  • salt and freshly ground black pepper to taste
  • 1 ½ cup (360 ml) commercially prepared barbecue sauce (Hak’s if you have it!)
  • 4 tablespoons (57g) butter
  • 12 Slider buns or Hawaiian rolls, split
  • Slider Slaw (recipe follows)

 For Slider Slaw

  • 1 tablespoon (15 ml) cider vinegar
  • 3 tablespoons (45 ml) prepared mayonnaise
  • 2 teaspoons (10 ml) sugar
  • 1 lemon, juice only
  • salt and pepper to taste
  • 2 cups shredded cabbage or cabbage slaw mix
  • black sesame seeds for garnish


INSTRUCTIONS

  1. Fill and preheat the SousVide Supreme to 132F/55C.
  2. Lightly season the ribs on all sides with salt and pepper and brush them lightly all over with the barbecue sauce to glaze them.
  3. Put the ribs about three to a pouch in a single layer into suitably sized cooking pouches, add the butter in chunks, and vacuum seal.
  4. Submerge the pouches in the water oven to cook for 48 hours.
  5. Before serving, heat a grill or grill pan to high heat and sear the meat on all sides to caramelize the surfaces.
  6. Brush the top and bottom of the slider buns with barbecue sauce.
  7. Pull the meat right off the bone and onto slider buns bottoms, top with slaw and bun top, secure with a toothpick.

 For Slider Slaw

  1. In a bowl, whisk together the vinegar mayonnaise, sugar, lemon juice, salt and pepper until smooth.
  2. Add the cabbage or slaw mix and toss to coat evenly.
  3. Use to top sliders or serve as a side dish.

Vivian’s Eye Round Steak Sous Vide

With Fingerling Potatoes, Escarole, and Radicchio
Courtesy of Vivian Peterson of V Top Secret Chef
Serves 3Vivian’s Eye Round Steak Sous Vide #sousvide

 INGREDIENTS

  • 3 (4 to 6 ounce / 114 to 170 g ) eye of round steaks
  • 1/2 teaspoon (2.5 ml) truffle salt
  • 1/2 teaspoon (2.5 ml) ground black pepper
  • 1/2 teaspoon (2.5 ml) whole peppercorns
  • 4 teaspoons (22.5 ml) butter, divided use
  • 1 pound (456 g) fingerling potatoes, quartered
  • 1 tablespoon (15 ml) high smoke point oil (vegetable, grapeseed, lard, ghee)
  • 1 head radicchio, washed and coarsely chopped
  • 1 head of escarole, washed and coarsely chopped
  • 1-2 Meyer lemons, for zest and juice
  • 1 teaspoon (5 ml) balsamic vinegar
  • 1 ounces (28 g) shaved parmesan (optional)


INSTRUCTIONS

For the steaks

  1. Fill and preheat the SousVide Supreme or Demi to correct temperature for desired degree of doneness (134F/56.5 C for medium rare to 140F/60C for medium.)
  2. Season each steak with truffle salt and ground pepper and a teaspoon of butter.
  3. Put the steaks into a cooking pouch, add the peppercorns, and vacuum seal.
  4. Submerge in the water oven and cook for 48 hours (2 days.)
  5. Remove pouch from the water oven and, if not ready to proceed, quick chill the pouch, submerged in an ice water bath for 30 minutes. Refrigerate until ready to proceed. (Rewarm the pouch in the water oven at cooking temperature to reheat.)
  6. To finish, remove the steaks from the pouch, reserving the cooking juices in the pouch.
  7. Heat a lightly oiled skillet over high heat and sear the steaks on both sides about a minute to caramelize their surfaces.
  8. Add the juices from the pouch to the skillet, reduce the heat, and simmer for a few minutes.

For the fingerling potatoes

  1. Fill and preheat (or raise) the temperature of the SousVide Supreme water oven to 180F/82C.
  2. Season the potatoes with salt, pepper, and one teaspoon of the butter; put them into a cooking pouch and vacuum seal.
  3. Submerge the pouch in the water oven and cook for an hour and a half.
  4. Remove the pouch from the water oven, open, and drain off any liquid.
  5. Heat the vegetable oil (or ther oil) in a skillet over medium high heat and pan sear the potatoes for 3 to 5 minutes for extra crispness.
  6. Add the chopped escarole and radicchio and toss to wilt.
  7. Zest the lemons over the potatoes, squeeze the juice over them, and toss to combine.

Plating instructions

  1. Center a mound of the potatoes, escarole, and radicchio on each plate.
  2. Slice the steaks and put the slices over the potatoes.
  3. Top with shaved parmesan, if desired.

Sous Vide Pork Belly Sliders

Sliders
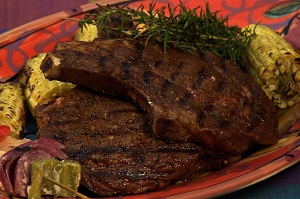
Courtesy of Master Chef star, Sharone Hakman (
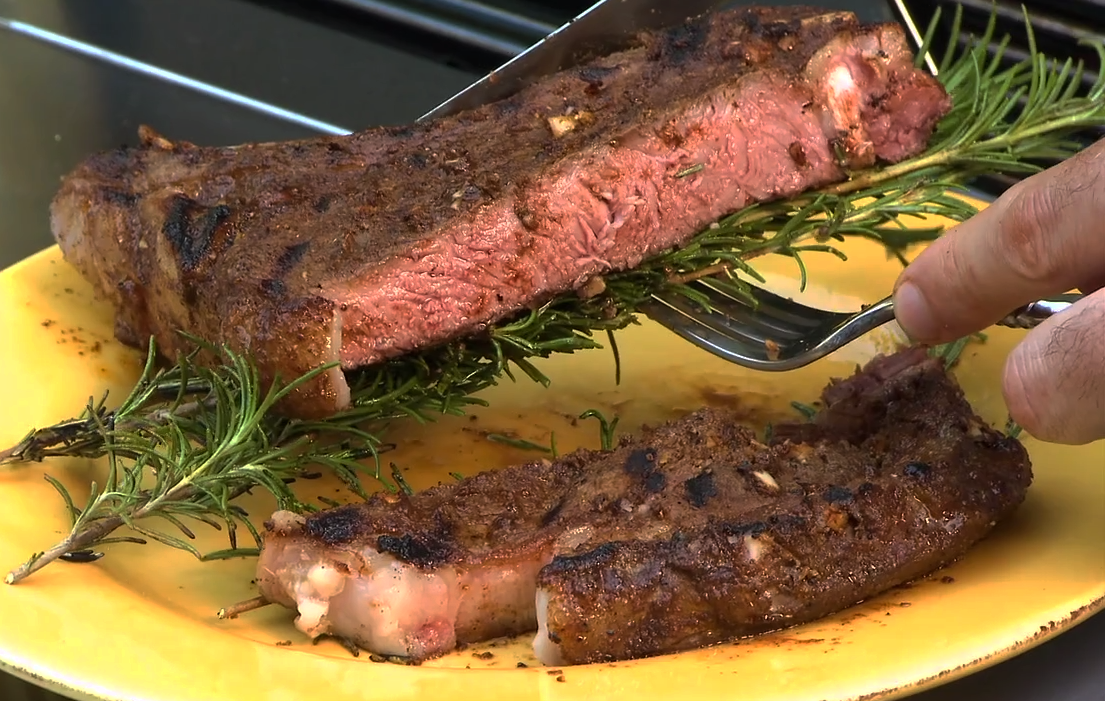
SharonHakman.com)
Serves 12

INGREDIENTS

For the pork belly

  • 2-1/2 pounds (1 kg) pork belly
  • 1/4 cup (57 g) brown sugar, lightly packed
  • 1 tablespoon (15 ml) good bourbon
  • 1 teaspoon (5 ml) crushed red chile pepper
  • Salt and pepper to taste
  • 1 recipe Slider Slaw (follows)
  • 12 slider buns

For the Slider Slaw

  • 1 tablespoon (15 ml) cider vinegar
  • 3 tablespoons (45 ml) prepared mayonnaise
  • 2 teaspoons (10 ml) sugar
  • 1 lemon, juice only
  • salt and pepper to taste
  • 2 cups shredded cabbage or cabbage slaw mix
  • black sesame seeds for garnish

INSTRUCTIONS

For the pork belly 

  1. Fill and preheat the SousVide Supreme to 176F/80C.
  2. Put the pork belly, brown sugar, bourbon and crushed red pepper into a large (gallon/3.8 liter) cooking pouch and vacuum seal.
  3. Submerge the pouch in the water oven and cook for at least 10 hours, but up to 18 hours will make the meat even more tender.
  4. Preheat a grill to medium heat.
  5. Season the pork belly on both sides with salt and pepper to taste and grill the pork for 30 to 45 seconds per side to get a tasty crust all around.
  6. Slice the belly and transfer to a warm platter.

For the Slider Slaw

  1. In a bowl, whisk together the vinegar mayonnaise, sugar, lemon juice, salt and pepper until smooth.
  2. Add the cabbage or slaw mix and toss to coat evenly.
  3. Use to top sliders or serve as a side dish.

To assemble the sliders

  1. Lightly toast the slider buns
  2. Brush the bottom bun with barbecue sauce, if desired, and pile on the pork belly and slaw.
  3. Top with the other half bun and serve.


Whitney Miller’s Caramel Apple ‘Pie’

Sous Vide Caramel Apple ‘Pie’
Courtesy of MasterChef’s Whitney Miller

INGREDIENTS

For the apples

  • 4 small Granny Smith apples, cored (not peeled)
  • 2 tablespoons (30 ml) lemon juice
  • 4 tablespoons (2 ounces/113 g) unsalted butter, softened
  • 1/4 teaspoon (2.5 ml) ground cinnamon
  • 4 teaspoons (20 ml) light brown sugar

For the caramel sauce

  • 1 can (14 ounces/396 g) sweetened condensed milk

For the topping

  • 1/2 cup (33 g) all-purpose flour
  • 1/4 cup plus 1 tablespoon (63 g) light brown sugar
  • 1/8 teaspoon (0.6 ml) kosher salt
  • 1/4 teaspoon (1.25 ml). ground cinnamon
  • 3 tablespoons (85 g) chilled unsalted butter
  • 1/2 cup (60 g) chopped pecans
  • Butter pecan ice cream, optional, for serving


INSTRUCTIONS

  1. Fill and preheat SousVide Supreme to 183F/84C.
  2. Make the caramel sauce by pouring the condensed milk into a small (quart/0.9 liter) cooking pouch, evacuate as much air as possible from the pouch with your hands, and seal. (Even easier: use SousVide Supreme Zipper Pouches and the Archimedes Principle to remove the air from the pouch and zip the seal closed.)
  3. Submerge the pouch in the water oven and cook for 6 and ½ hours or even over night. If not using right away, quick chill the pouch in an ice water bath and refrigerate.
  4. When ready to cook the apples, pour 1/2 tablespoon of the lemon juice into the middle of each cored apple, swirling to coat the inside of the apple.
  5. In a small bowl, combine the butter, cinnamon, and brown sugar.
  6. Divide the butter mixture evenly among the apples, rubbing the mixture all around the inside of the apple and stuffing it well.
  7. Put apples, 2 per pouch, into small (quart/0.9 liter) pouches and vacuum seal tightly.
  8. Submerge the pouches in the water oven, being sure that the apples remain fully beneath the water surface throughout cooking, and cook for 1 and 1/2 hours. (If necessary, position the pouches in the slots of the pouch rack and invert the rack in the water bath to hold them into place, beneath the water surface, during cooking.)
  9. Reheat the caramel sauce in its pouch along side the apples in the last half hour of baking.
  10. Meanwhile, preheat the traditional oven to 350F/177C to prepare the crumble topping.
  11. In a small bowl, mix the flour, brown sugar, salt, and cinnamon together in a small bowl.
    1. Using two forks or a pastry cutter, cut the butter into the flour mixture until mixture resembles wet sand.
    2. Stir in the pecans.
    3. Pour the crumble mixture on a baking sheet and bake for 17 minutes or until golden brown.
  12. Serve the apples straight from the pouch, topped with a few spoonfuls of the topping, and drizzled with caramel sauce. If desired, add a scoop of butter pecan ice cream.

Herb Rubbed Ribeye Steaks

Courtesy of Sharone Hakman (SharonHakman.com)
Serves 4

sharone hakman's rib-eye steaks cooked sous vide

INGREDIENTS

  • 1 bunch (6 to 8 sprigs) thyme, minced, woody stems discarded
  • 4 sprigs rosemary, leaves minced
  • 4 to 6 cloves garlic, peeled and minced
  • 2 teaspoons (10 ml) kosher salt,
  • 1 teaspoon (5 ml) coarse black pepper
  • 1 teaspoon (5 ml) ground thyme
  • 1 teaspoon (5 ml) garlic powder
  • 1 teaspoon (5 ml) paprika
  • 1 teaspoon (5 ml) ground coriander
  • 1 teaspoon (5 ml) chili powder
  • 2 tablespoons (30 ml) softened butter or olive oil.
  • 2 rib eyes, bone-in, 1-1/2 inches (3.8 cm) thick

INSTRUCTIONS

  1. Fill and preheat the water oven to desired degree of doneness (134F/56.5C for medium rare, 140F/60C for medium, 150F/65.5C for medium well.)
  2. In a small bowl, mix together all ingredients, except steaks, stirring until well blended.
  3. Spread the rub over all surfaces of the steak and massage into the meat.
  4. Put each steak into a small (quart/.9 liter) cooking pouch and vacuum seal.
  5. Submerge in the water oven and cook for at least 1-1/2 hour and up to 8 hours (the longer the
  6. better for leaner, tougher steaks, such as from bison or grass fed cattle)
  7. Remove pouches from the water oven.
  8. When ready to serve, preheat and oil a grill or grill pan over high heat.
  9. Remove the steaks from the pouches, pat their surfaces dry, and sear over high heat for 30 to 45 seconds per side to impart color, flavor, and grill marks.
  10. Serve.